freebsd9.2配置postfix的smtp認證步驟(圖解)
1:卸載sendmail
cd /usr/ports/mail/sendmail
make deinstall
make clean
2:安裝postfix
cd /usr/ports/mail/postfix
make config #開啟pcre,SASL2,BDB etc..
make install clean
安裝時候會同時安裝cyrus-sasl2庫,選擇配置時候選上BDB等..
安裝時還會提示是否替換系統默認的mail程序,此處替換,因為已經卸載sendmail
Would you like to activate Postfix in /etc/mail/mailer.conf [n]? Y
3:如果沒有提示安裝cyrus-sasl2庫,則需要自己手動安裝,配置同上圖
cd /usr/ports/security/cyrus-sasl2
make install clean
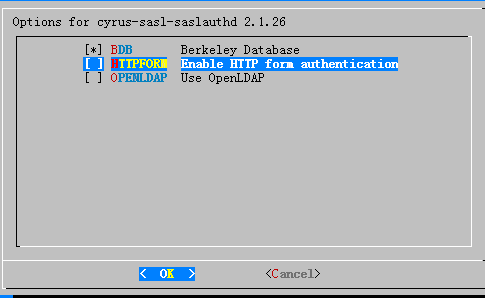
4.安裝cyrus-sasl2-saslauthd程序,選擇配置時候選上BDB
cd /usr/ports/security/cyrus-sasl2-saslauthd
make install clean
添加一個系統用戶 test,測試認證是否正常
testsaslauthd -u test -p pasword 命令測試時,失敗提示: 0:NO “authentication failed” 成功則提示0: OK “Success.”
安裝完成后加入啟動項
ee /etc/rc.conf
加入
saslauthd_enable=”YES”
postfix_enable=”YES”
5.編輯/usr/local/etc/postfix/main.cf 最下面加入
#本機郵件服務器域名,在域名里做一下mx解析,指向本機的公網ip,避免被識別為垃圾
myorigin = mail3.me.com
#開啟smtp
smtpd_sasl_auth_enable = yes
broken_sasl_auth_clients = yes
#白名單ip,可以不用驗證密碼
mynetworks = 168.100.189.0/28, 127.0.0.0/8
smtpd_recipient_restrictions = permit_mynetworks permit_inet_interfaces permit_sasl_authenticated permit_mx_backup reject_unauth_destination
smtpd_client_restrictions = permit_sasl_authenticated
smtpd_sasl_local_domain = $myhostname
6.打開目錄 /usr/local/lib/sasl2/里面有個Sendmail.conf,重要!
cp Sendmail.conf smtpd.conf
生成/etc/aliases.db,運行 重要!
newaliases
相關文章:
 網公網安備
網公網安備