Android自定義View實現帶4圓角或者2圓角的效果
1 問題
實現任意view經過自定義帶4圓角或者2圓角的效果
2 原理
1) 實現view 4圓角

我們只需要把左邊的圖嵌入到右邊里面去,最終顯示左邊的圖就行。
2) 實現view上2圓角
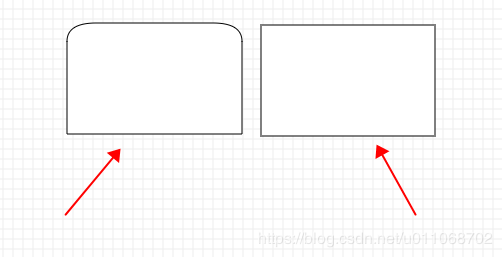
我們只需要把左邊的圖嵌入到右邊里面去,最終顯示左邊的圖就行。
安卓源碼里面有這樣的類
package android.graphics; /** * <p>Specialized implementation of {@link Paint}’s * {@link Paint#setXfermode(Xfermode) transfer mode}. Refer to the * documentation of the {@link PorterDuff.Mode} enum for more * information on the available alpha compositing and blending modes.</p> * */public class PorterDuffXfermode extends Xfermode { /** * Create an xfermode that uses the specified porter-duff mode. * * @param mode The porter-duff mode that is applied */ public PorterDuffXfermode(PorterDuff.Mode mode) { porterDuffMode = mode.nativeInt; }}
然后我們看下點擊mode進去看下
/** * @hide */ public static Mode intToMode(int val) { switch (val) { default: case 0: return Mode.CLEAR; case 1: return Mode.SRC; case 2: return Mode.DST; case 3: return Mode.SRC_OVER; case 4: return Mode.DST_OVER; case 5: return Mode.SRC_IN; case 6: return Mode.DST_IN; case 7: return Mode.SRC_OUT; case 8: return Mode.DST_OUT; case 9: return Mode.SRC_ATOP; case 10: return Mode.DST_ATOP; case 11: return Mode.XOR; case 16: return Mode.DARKEN; case 17: return Mode.LIGHTEN; case 13: return Mode.MULTIPLY; case 14: return Mode.SCREEN; case 12: return Mode.ADD; case 15: return Mode.OVERLAY; } }
什么意思呢?
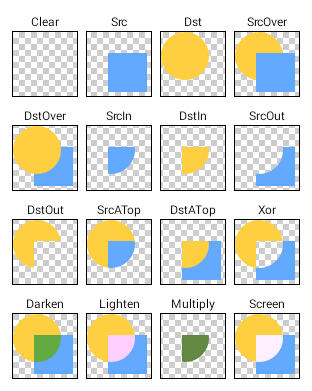
應該可以看得懂,這里每個圖片顯示的效果是最終的效果,然后很明顯,我們這里需要的是SrcIn效果,我們要把左圖的效果嵌套到右圖里面去。
3 代碼實現
1)MyTextView.java文件如下
package com.onemt.sdk.circle; import android.content.Context;import android.graphics.Canvas;import android.graphics.Paint;import android.graphics.PorterDuff;import android.graphics.PorterDuffXfermode;import android.graphics.RectF;import android.util.AttributeSet; import androidx.annotation.NonNull;import androidx.annotation.Nullable;import androidx.appcompat.widget.AppCompatTextView; public class MyTextView extends AppCompatTextView { private final RectF roundRect = new RectF(); private final Paint desPaint = new Paint(); private final Paint srcPaint = new Paint(); private float mRadius = 10; private boolean isChange = false; public MyTextView(@NonNull Context context) { super(context); init(); } public MyTextView(@NonNull Context context, @Nullable AttributeSet attrs) { super(context, attrs); init(); } public MyTextView(@NonNull Context context, @Nullable AttributeSet attrs, int defStyleAttr) { super(context, attrs, defStyleAttr); init(); } public void change(boolean isChange) { this.isChange = isChange; invalidate(); } public void init() { desPaint.setAntiAlias(true);//設置抗鋸齒 desPaint.setXfermode(new PorterDuffXfermode(PorterDuff.Mode.SRC_IN)); srcPaint.setAntiAlias(true); float density = getResources().getDisplayMetrics().density; mRadius *= density; } @Override protected void onLayout(boolean changed, int left, int top, int right, int bottom) { super.onLayout(changed, left, top, right, bottom); int width = getWidth(); int height = getHeight(); roundRect.set(0, 0, width, height); } @Override public void draw(Canvas canvas) { //保存最原始的roundRect canvas.saveLayer(roundRect, srcPaint, Canvas.ALL_SAVE_FLAG); if (isChange) { //保存去掉頭部2圓角的roundRect(實際就是保留底部的2個圓角) canvas.drawRect(roundRect.left, (roundRect.top + roundRect.bottom) / 2, roundRect.right, roundRect.bottom, srcPaint); //保存去掉底部2圓角的roundRect(實際就是保留頂部的2個圓角)// canvas.drawRect(roundRect.left, roundRect.top, roundRect.right, roundRect.bottom / 2, srcPaint); } //保存掉頭部2圓角的roundRect canvas.drawRoundRect(roundRect, mRadius, mRadius, srcPaint); //保存疊加后的內容 canvas.saveLayer(roundRect, desPaint, Canvas.ALL_SAVE_FLAG); super.draw(canvas); //清空所有的圖像矩陣修改狀態 canvas.restore(); } }
如果你看不懂這個函數drawRoundRect,請看下我的這篇博客介紹 Android之Canvas的drawRoundRect()
2)MainActivity.java文件如下
package com.onemt.sdk.circle; import androidx.appcompat.app.AppCompatActivity; import android.os.Bundle;import android.view.View; public class MainActivity extends AppCompatActivity { public MyTextView myTextView; public boolean isChange = true; @Override protected void onCreate(Bundle savedInstanceState) { super.onCreate(savedInstanceState); setContentView(R.layout.activity_main); myTextView = findViewById(R.id.my_textview); myTextView.setOnClickListener(new View.OnClickListener() { @Override public void onClick(View v) { if (isChange) { myTextView.change(true); isChange = false; } else { myTextView.change(false); isChange = true; } } }); }}
3)activity_main.xml文件如下
<?xml version='1.0' encoding='utf-8'?><androidx.constraintlayout.widget.ConstraintLayout xmlns:android='http://schemas.android.com/apk/res/android' xmlns:app='http://schemas.android.com/apk/res-auto' xmlns:tools='http://schemas.android.com/tools' android:layout_width='match_parent' android:layout_height='match_parent' tools:context='.MainActivity'> <com.onemt.sdk.circle.MyTextView android: android:layout_width='100dp' android:layout_height='100dp' android:background='@color/colorAccent' app:layout_constraintBottom_toBottomOf='parent' app:layout_constraintLeft_toLeftOf='parent' app:layout_constraintRight_toRightOf='parent' app:layout_constraintTop_toTopOf='parent' /> </androidx.constraintlayout.widget.ConstraintLayout>
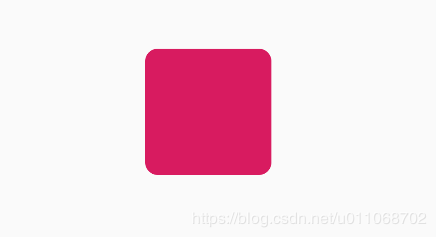
4 效果
初始進來如下效果,4圓角效果
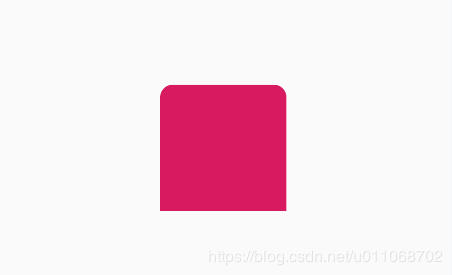
然后我們點擊圖片切換效果如下,上2圓角效果
總結
到此這篇關于Android自定義View實現帶4圓角或者2圓角的效果的文章就介紹到這了,更多相關android 自定義view 圓角內容請搜索好吧啦網以前的文章或繼續瀏覽下面的相關文章希望大家以后多多支持好吧啦網!
相關文章:
 網公網安備
網公網安備