Android繪圖技巧使用詳解
本文實例為大家分享了Android繪圖技巧使用的具體代碼,供大家參考,具體內(nèi)容如下
XML繪圖
Bitmap
<?xml version='1.0' encoding='utf-8'?><bitmap xmlns:android='http://schemas.android.com/apk/res/android' android:src='http://www.baoyu77737.com/bcjs/@drawable/giao'/>
Shape
<?xml version='1.0' encoding='utf-8'?><shape xmlns:android='http://schemas.android.com/apk/res/android' android:shape='rectangle'> <gradient android:startColor='#FF5DA2FF' android:endColor='#805FBBEF' android:angle='45'/> <padding android:bottom='7dp' android:top='7dp' android:left='7dp' android:right='7dp'/> <corners android:radius='8dp'/></shape>
Layer(實現(xiàn)Photoshop中類似圖層的概念)
<?xml version='1.0' encoding='utf-8'?><layer-list xmlns:android='http://schemas.android.com/apk/res/android'> <item android:drawable='@drawable/default_head'/> <item android:drawable='@drawable/default_head' android:left='10dip' android:right='10dip' android:top='10dip' android:bottom='10dip'/> <item android:drawable='@drawable/giao' android:left='200dp' android:right='200dp' android:top='200dp' android:bottom='200dp'/><!-- 圖層效果--></layer-list>
Selector(幫助開發(fā)者實現(xiàn)靜態(tài)繪圖中的時間反饋)
<?xml version='1.0' encoding='utf-8'?><selector xmlns:android='http://schemas.android.com/apk/res/android'> <item android:state_pressed='true'> <shape android:shape='rectangle'> <solid android:color='#33FD0000'/> <corners android:radius='5dp'/> <padding android:left='10dp' android:right='10dp' android:top='10dp' android:bottom='10dp'/> </shape> </item> <item> <shape android:shape='rectangle'> <solid android:color='#ffffffff'/> <corners android:radius='5dp'/> <padding android:left='10dp' android:right='10dp' android:top='10dp' android:bottom='10dp'/> </shape> </item><!-- 點擊反饋效果--></selector>
Android繪圖技巧
Canvas(作為繪制圖形的直接對象)
Canvas.save();
可以理解為保存畫布,作用是將之前的所有已經(jīng)繪制圖像保存起來,讓后續(xù)的操作就好像在一個新的圖層上操作一樣
Canvas.restore();
可以理解為Photoshop中的合并圖層操作,作用是將save()之后繪制的所有的圖像與save()之前的圖像進行合并
Canvas.translate();
坐標(biāo)系的平移
Canvas.rotate();
坐標(biāo)系的旋轉(zhuǎn)
Layer圖層
特別注意的是 saveLayerAlpha()與restore()要同時使用,才能夠在canvas 畫出多個層次,就是花多少層就要有多少對兩個函數(shù)!
@Override protected void onDraw(Canvas canvas) { //super.onDraw(canvas); drawLayer(canvas); //圖層同樣是基于棧的結(jié)構(gòu)進行管理的 @SuppressLint('DrawAllocation') Paint paint=new Paint(); canvas.drawColor(Color.WHITE); paint.setColor(Color.BLUE); canvas.drawCircle(150,150,100,paint); canvas.saveLayerAlpha(0,0,400,400,127);//入棧(創(chuàng)建新圖層) paint.setColor(Color.RED); canvas.drawCircle(200,200,100,paint); canvas.restore();//出棧 }
像素點分析
bitmap.getPixels(pixels,offset,stride,x,y,width,height);
參數(shù)含義如下:
pixels:接受位圖顏色值的數(shù)組 offset:寫入到pixels[]中的第一個索引值 stride:pixels[]的行間距 x:從位圖中讀取的第一個像素的x坐標(biāo)值 y:從位圖中讀取的第一個像素的y坐標(biāo)值 width:每一行中讀取的像素寬度 height:讀取的行數(shù)畫筆特效處理
PorterDuffXfermode
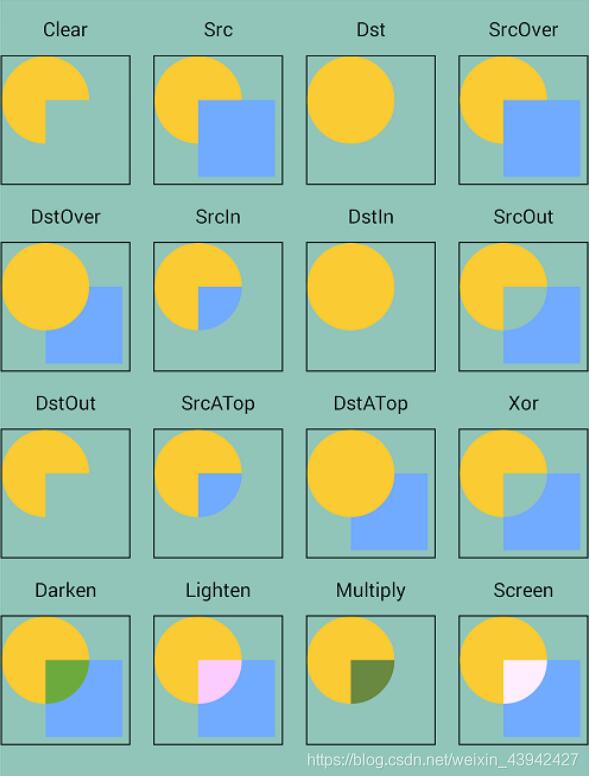
public class FilletView extends View { private Bitmap bitmap,out; private Paint paint; public FilletView(Context context) { super(context); inView(); } public FilletView(Context context, @Nullable AttributeSet attrs) { super(context, attrs); inView(); } public FilletView(Context context, @Nullable AttributeSet attrs, int defStyleAttr) { super(context, attrs, defStyleAttr); inView(); } private void inView(){ bitmap= BitmapFactory.decodeResource(getResources(), R.drawable.ask); out=Bitmap.createBitmap(bitmap.getWidth(),bitmap.getHeight(),Bitmap.Config.ARGB_8888); Canvas canvas=new Canvas(out); paint=new Paint(); paint.setAntiAlias(true); canvas.drawRoundRect(0,0,bitmap.getWidth(),bitmap.getHeight(),80,80,paint); paint.setXfermode(new PorterDuffXfermode(PorterDuff.Mode.SRC_IN)); canvas.drawBitmap(bitmap,0,0,paint); } @Override protected void onDraw(Canvas canvas) { canvas.drawBitmap(out,0,0,null); }}
Shader
BitmapShader:位圖Shader LinearGradient:線性Shader RadialGradient:光束Shader SweepGradient:梯度Shader ComposeShader:混合Shaderprivate void useBitmapShader(Canvas canvas){ @SuppressLint('DrawAllocation') Bitmap bitmap= BitmapFactory.decodeResource(getResources(), R.drawable.default_head); @SuppressLint('DrawAllocation') BitmapShader shader=new BitmapShader(bitmap, Shader.TileMode.REPEAT,Shader.TileMode.REPEAT); @SuppressLint('DrawAllocation') Paint paint=new Paint(); paint.setShader(shader); canvas.drawCircle(500,200,200,paint);} Shader.TileMode.REPEAT:重復(fù)——橫向、縱向不斷重復(fù) Shader.TileMode.CLAMP:拉伸——拉伸的圖片最后的那個像素,不斷重復(fù) Shader.TileMode.MIRROR:鏡像——橫向不斷翻轉(zhuǎn)重復(fù),橫向不斷翻轉(zhuǎn)重復(fù)
PathEffect(各種筆觸繪制一個路徑)
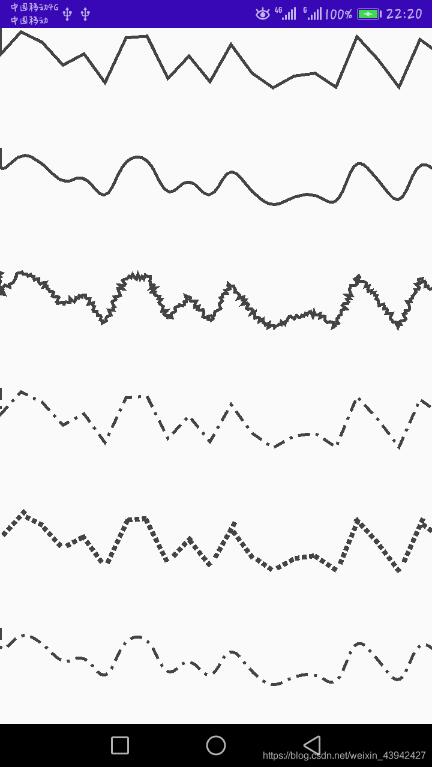
public class PathEffectView extends View { private Paint paint; private Path mainPath; private PathEffect[] effects; public PathEffectView(Context context, @Nullable AttributeSet attrs) { super(context, attrs); inView(); } private void inView(){ paint=new Paint(); paint.setStyle(Paint.Style.STROKE); paint.setStrokeWidth(5); paint.setColor(Color.DKGRAY); mainPath=new Path(); mainPath.moveTo(0,0); for (int i = 0; i <= 30; i++) { mainPath.lineTo(i*35, (float) (Math.random()*100)); } effects=new PathEffect[6]; } @SuppressLint('DrawAllocation') @Override protected void onDraw(Canvas canvas) { super.onDraw(canvas); effects[0]=null; effects[1]=new CornerPathEffect(30); effects[2]=new DiscretePathEffect(3,5); effects[3]=new DashPathEffect(new float[]{20,10,5,10},0); Path path=new Path(); path.addRect(0,0,8,8,Path.Direction.CCW); effects[4]=new PathDashPathEffect(path,12,0,PathDashPathEffect.Style.ROTATE); effects[5]=new ComposePathEffect(effects[3],effects[1]); for (PathEffect effect : effects) { paint.setPathEffect(effect); canvas.drawPath(mainPath, paint); canvas.translate(0, 200); } }}
SurfaceView
SurfaceView與View的區(qū)別:
1、View主要適用于主動更新的情況下,而SurfaceView主要適用于被動更新,例如頻繁的更新2、View在主線程中對畫面進行更新,而SurfaceView通常會通過一個子線程來進行頁面的刷新3、View在繪圖時沒有使用雙緩沖機制,而SurfaceView在底層機制中就已經(jīng)實現(xiàn)了雙緩沖機制
總結(jié):SurfaceView適合需要頻繁刷新,或者刷新時數(shù)據(jù)處理量比較大
public class SurfaceViewTemplate extends SurfaceView implements SurfaceHolder.Callback ,Runnable{ //SurfaceHolder private SurfaceHolder holder; //用于繪畫的Canvas private Canvas canvas; //子線程標(biāo)志位 private boolean isDrawing; private Paint paint; private Path path; private int x,y; public SurfaceViewTemplate(Context context) { super(context); inView(); } public SurfaceViewTemplate(Context context, AttributeSet attrs) { super(context, attrs); inView(); } public SurfaceViewTemplate(Context context, AttributeSet attrs, int defStyleAttr) { super(context, attrs, defStyleAttr); inView(); } private void inView(){ holder=getHolder(); holder.addCallback(this); setFocusable(false);//焦點 setFocusableInTouchMode(true); this.setKeepScreenOn(true); path=new Path(); paint=new Paint(Paint.ANTI_ALIAS_FLAG); paint.setColor(Color.RED); paint.setStyle(Paint.Style.STROKE); paint.setStrokeWidth(10); paint.setStrokeCap(Paint.Cap.ROUND); paint.setStrokeJoin(Paint.Join.ROUND); } @Override public void surfaceCreated(@NonNull SurfaceHolder surfaceHolder) { isDrawing=true; path.moveTo(0,400); new Thread(this).start(); } @Override public void surfaceChanged(@NonNull SurfaceHolder surfaceHolder, int i, int i1, int i2) { } @Override public void surfaceDestroyed(@NonNull SurfaceHolder surfaceHolder) { isDrawing=false; } @Override public void run() { while (isDrawing){ drawSome(); x+=1; y= (int) (100*Math.sin(x*2*Math.PI/180)+400); path.lineTo(x,y); } } private void drawSome(){ try { canvas=holder.lockCanvas(); //draw something... canvas.drawColor(Color.WHITE); canvas.drawPath(path,paint); } catch (Exception e) { e.printStackTrace(); } finally { if (canvas!=null){ holder.unlockCanvasAndPost(canvas); } } }}
以上就是本文的全部內(nèi)容,希望對大家的學(xué)習(xí)有所幫助,也希望大家多多支持好吧啦網(wǎng)。
相關(guān)文章:
1. 前端html+css實現(xiàn)動態(tài)生日快樂代碼2. XML 非法字符(轉(zhuǎn)義字符)3. 關(guān)于html嵌入xml數(shù)據(jù)島如何穿過樹形結(jié)構(gòu)關(guān)系的問題4. vue實現(xiàn)復(fù)制文字復(fù)制圖片實例詳解5. XML基本概念XPath、XSLT與XQuery函數(shù)介紹6. CSS3實例分享之多重背景的實現(xiàn)(Multiple backgrounds)7. XML入門的常見問題(三)8. el-input無法輸入的問題和表單驗證失敗問題解決9. 不要在HTML中濫用div10. XML入門的常見問題(四)

 網(wǎng)公網(wǎng)安備