Java基礎(chǔ)之Spring5的核心之一IOC容器
1)控制反轉(zhuǎn),把創(chuàng)建對(duì)象和對(duì)象的調(diào)用過程交給Spring 管理。
2)使用IOC的目的,為了降低耦合度。
二、IOC的底層原理XML解析、工廠模式、反射
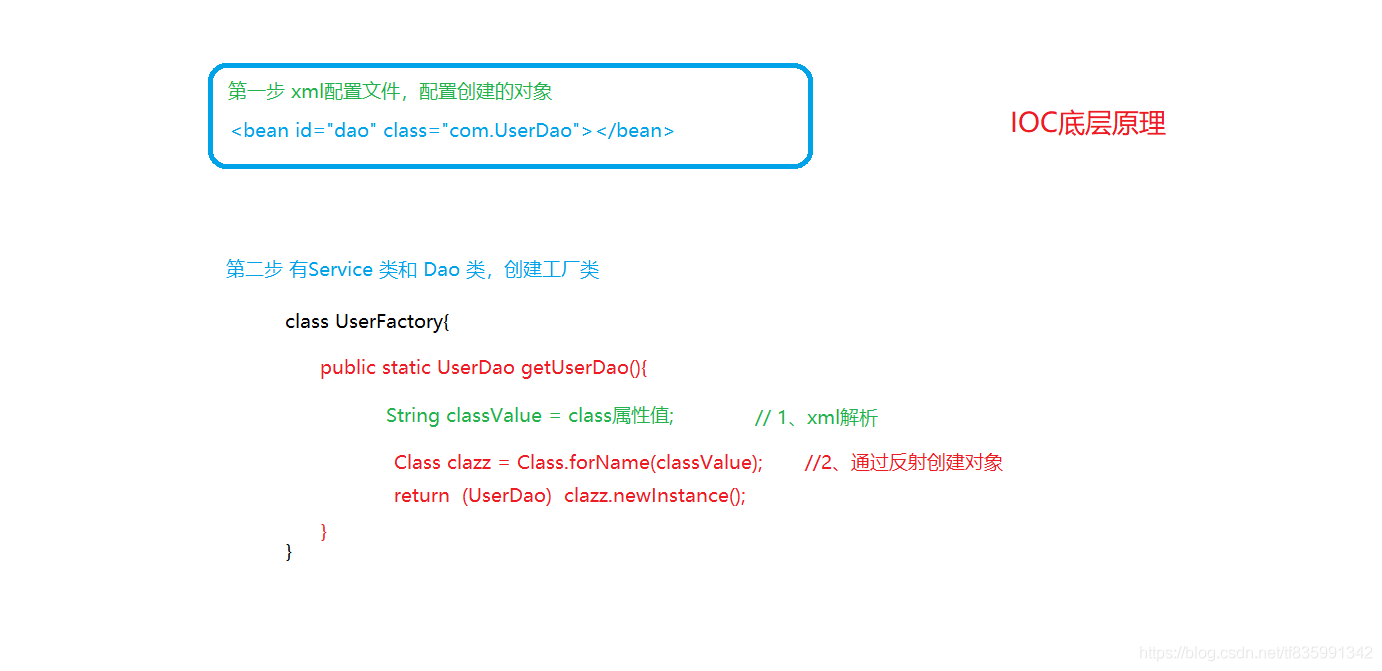
基于IOC容器完成,IOC容器底層就是對(duì)象工廠。
四、Spring 提供IOC容器實(shí)現(xiàn)兩種方式:(兩個(gè)接口)(1)BeanFactory:IOC容器基本實(shí)現(xiàn),是Spring內(nèi)部的使用接口,不提供開發(fā)人員使用
特點(diǎn):加載配置文件的時(shí)候不會(huì)創(chuàng)建對(duì)象,在獲取(使用)對(duì)象才去創(chuàng)建。
(2)ApplicationContext:BeanFactory接口的子接口。提供開發(fā)人員使用
特點(diǎn):在加載配置文件的時(shí)候就創(chuàng)建對(duì)象
五、IOC操作之Bean管理1、什么是Bean管理:
Bean管理指的是兩個(gè)操作:Spring創(chuàng)建對(duì)象Spring注入值:手動(dòng)注入、自動(dòng)裝配
<!--創(chuàng)建對(duì)象、自動(dòng)裝配 bean標(biāo)簽里面的autowire屬性:屬性值:byName:根據(jù)屬性名字注入值,id的值必須與類里面的屬性名稱一樣 byType:根據(jù)屬性的類型注入值。--><bean autowire='byType'> <!--手動(dòng)裝配--> <!--<property name='dept' ref='dept'></property>--></bean>
2、IOC操作之Bean管理兩種方式
1)基于XML配置文件方式:
首先創(chuàng)建一個(gè)User類:
public class User { private Integer id;private String name; public User() {} public User(Integer id, String name) { this.id = id; this.name = name;} public void setId(Integer id) { this.id = id;} public void setName(String name) { this.name = name;} public void setAddress(String address) { this.address = address;} }
在XML配置文件中配置User對(duì)象:
<!--1、配置User對(duì)象 id:為創(chuàng)建后的對(duì)象名,可自取 class:為類的全路徑 --><bean class='tianfei.Spring5.User'> <!--2、通過set方法注入屬性 通過property注入屬性 name :類里面的屬性 value :類里面屬性對(duì)應(yīng)的值 --> <property name='id' value='1'></property> <property name='name' value='田飛'></property> <!--通過有參構(gòu)造注入屬性--> <constructor-arg name='id' value='2'></constructor-arg> <constructor-arg name='name' value='張三'></constructor-arg> <!--通過p名稱空間注入屬性 使用前,需在xml標(biāo)簽屬性中加入:xmlns:p='http://www.springframework.org/schema/p' --> <bean p: p:name='李四'></bean></bean>
測(cè)試類:
public class testDemo { @Test public void test() {//1、加載Spring5 的xml配置文件ApplicationContext context = new ClassPathXmlApplicationContext('bean1.xml');//2、獲取配置創(chuàng)建的對(duì)象User user = context.getBean('usera', User.class);System.out.println(user); }}
補(bǔ)充:在XML配置文件中引入外部文件(以jdbc.properties)
<!--引入外部文件 jdbc.properties需在名稱空間中加入:xmlns:context='http://www.springframework.org/schema/context' --> <context:property-placeholder location='classpath:jdbc.properties'></context:property-placeholder> <bean ><property name='driverClassName' value='${prop.driverClassName}'></property><property name='url' value='${prop.url}'></property><property name='username' value='${prop.username}'></property><property name='password' value='${prop.password}'></property> </bean>
jdbc.properties配置文件內(nèi)容如下:
prop.driverClassName=com.mysql.jdbc.Driverprop.url=jdbc:mysql://localhost:3306/userdbprop.username=rootprop.password=tianfei
2)基于注解方式(以UserDao接口以及其實(shí)現(xiàn)類和UserService類為例)
public interface UserDao { public void add(); }@Controller(value = 'userDaoImpl') public class UserDaoImpl implements UserDao { @Overridepublic void add() { System.out.println('userdao add.......');} public UserDaoImpl() {} }
//value屬性可以省略,如果省略則默認(rèn)創(chuàng)建的對(duì)象名為 類名首字母小寫 對(duì)象@Service(value = 'userService')public class UserService { //基于注解注入基本類型數(shù)據(jù) @Value(value = 'abc') private String str; //基于注解注入對(duì)象類型值// @Autowired //根據(jù)類型注入// @Qualifier(value = 'userDaoImpl') //根據(jù)名稱注入 需要和 Autowired 一起使用// private UserDao userDao;// @Resource //根據(jù)類型注入 @Resource(name = 'userDaoImpl') //根據(jù)名稱注入 private UserDao userDao; public void add() {System.out.println('service add........');userDao.add(); } public void test() {System.out.println('userDao = ' + userDao);System.out.println(str); }}
測(cè)試類:
public class test { @Test public void test1(){//測(cè)試使用注解創(chuàng)建對(duì)象//需要在mxl配置文件中配置:<context:component-scan base-package='tianfei.Spring5'></context:component-scan> ,來開啟注解掃描組件//不需要添加set方法ApplicationContext context = new ClassPathXmlApplicationContext('bean1.xml');UserService userService = context.getBean('userService', UserService.class);System.out.println(userService);userService.add();userService.test(); } @Test public void test2(){//測(cè)試使用注解創(chuàng)建對(duì)象//不需要添加set方法//使用完全注解ApplicationContext context = new AnnotationConfigApplicationContext(SpringConfig.class);UserService userService = context.getBean('userService', UserService.class);System.out.println(userService);userService.add();userService.test(); }}
使用完全注解時(shí)需要?jiǎng)?chuàng)建一個(gè)類作為配置類:
@Configuration //作為配置類,代替xml配置文件,進(jìn)行完全注解開發(fā)@ComponentScan(value = {'tianfei.Spring5'})public class SpringConfig {}
3、IOC操作Bean管理(工廠Bean)
Spring有兩種Bean:
1)普通Bean:在配置文件中定義bean類型就是返回值類型
2)工廠Bean:在配置文件中定義bean類型和返回值類型可以不一樣
第一步:創(chuàng)建一個(gè)類,作為工廠bean,實(shí)現(xiàn)接口FactoryBean
第二步:實(shí)現(xiàn)接口中得方法,在實(shí)現(xiàn)的方法中定義返回的bean類型
public class MyBean implements FactoryBean<User> { //用來改變返回對(duì)象(返回的對(duì)象可以和創(chuàng)建的對(duì)象不一樣) @Override public User getObject() throws Exception {return new User(1,'張三'); } @Override public Class<?> getObjectType() {return null; } @Override public boolean isSingleton() {return false; }}
創(chuàng)建 MyBean.xml文件添入:
<!--創(chuàng)建類的對(duì)象--><bean class='tianfei.Spring5.factorybean.MyBean'></bean>
測(cè)試類:
public class test { @Test public void testMyBean() {//測(cè)試 FactoryBean 工廠ApplicationContext context = new ClassPathXmlApplicationContext('MyBean.xml');Book book = context.getBean('myBean',Book.class);System.out.println(book); }}
4、Bean的生命周期(加上后置處理器后共七步):
(1)通過無參構(gòu)造器創(chuàng)建bean實(shí)例(無參構(gòu)造)(2)為 bean的屬性注入值或引用其他bean(set方法)(3)把 bean 實(shí)例傳遞給 bean 后置處理器方法 postProcessBeforeInitialization(4)調(diào)用 bean的初始化方法(需要自行配置初始化方法)(5)把 bean 實(shí)例傳遞給 bean 后置處理器方法 postProcessAfterInitialization(6)獲取 bean實(shí)例對(duì)象(7)當(dāng)容器關(guān)閉時(shí),調(diào)用 bean的銷毀方法(需要自行配置銷毀方法)
到此這篇關(guān)于Java基礎(chǔ)之Spring5的核心之一IOC容器的文章就介紹到這了,更多相關(guān)Java Spring5的核心IOC容器內(nèi)容請(qǐng)搜索好吧啦網(wǎng)以前的文章或繼續(xù)瀏覽下面的相關(guān)文章希望大家以后多多支持好吧啦網(wǎng)!
相關(guān)文章:
1. WMLScript的語法基礎(chǔ)2. html小技巧之td,div標(biāo)簽里內(nèi)容不換行3. msxml3.dll 錯(cuò)誤 800c0019 系統(tǒng)錯(cuò)誤:-2146697191解決方法4. ASP中if語句、select 、while循環(huán)的使用方法5. XML入門的常見問題(四)6. php bugs代碼審計(jì)基礎(chǔ)詳解7. ASP使用MySQL數(shù)據(jù)庫(kù)的方法8. xml中的空格之完全解說9. ASP中解決“對(duì)象關(guān)閉時(shí),不允許操作。”的詭異問題……10. ASP動(dòng)態(tài)網(wǎng)頁(yè)制作技術(shù)經(jīng)驗(yàn)分享
 網(wǎng)公網(wǎng)安備